Saturday, December 26, 2015

Flexible display

A flexible display is a display which is flexible in nature; differential able  from the more prevalent traditional flat screen displays used in most electronics devices. In the recent years there has been a growing interest from numerous consumer electronics manufacturers to apply this display technology in e-readers,mobile phones and other consumer electronics.


            when Samsung and LG (or anyone) talk about a flexible display, they're talking about the organic light-emitting diode, or OLED, layer -- located beneath the cover glass -- that's now made using flexible materials (like plastic) rather than rigid glass.
            Companies like LG and Samsung have spent years demoing flexible displays that sit on their own outside of any device. These eye-catching products faithfully show off the interface you're supposed to see -- say a grid of icons -- without bending or breaking. Samsung's Galaxy Round represents the first time that a phone maker is bringing a flexible display to market, followed by the LG G Flex.

Working:
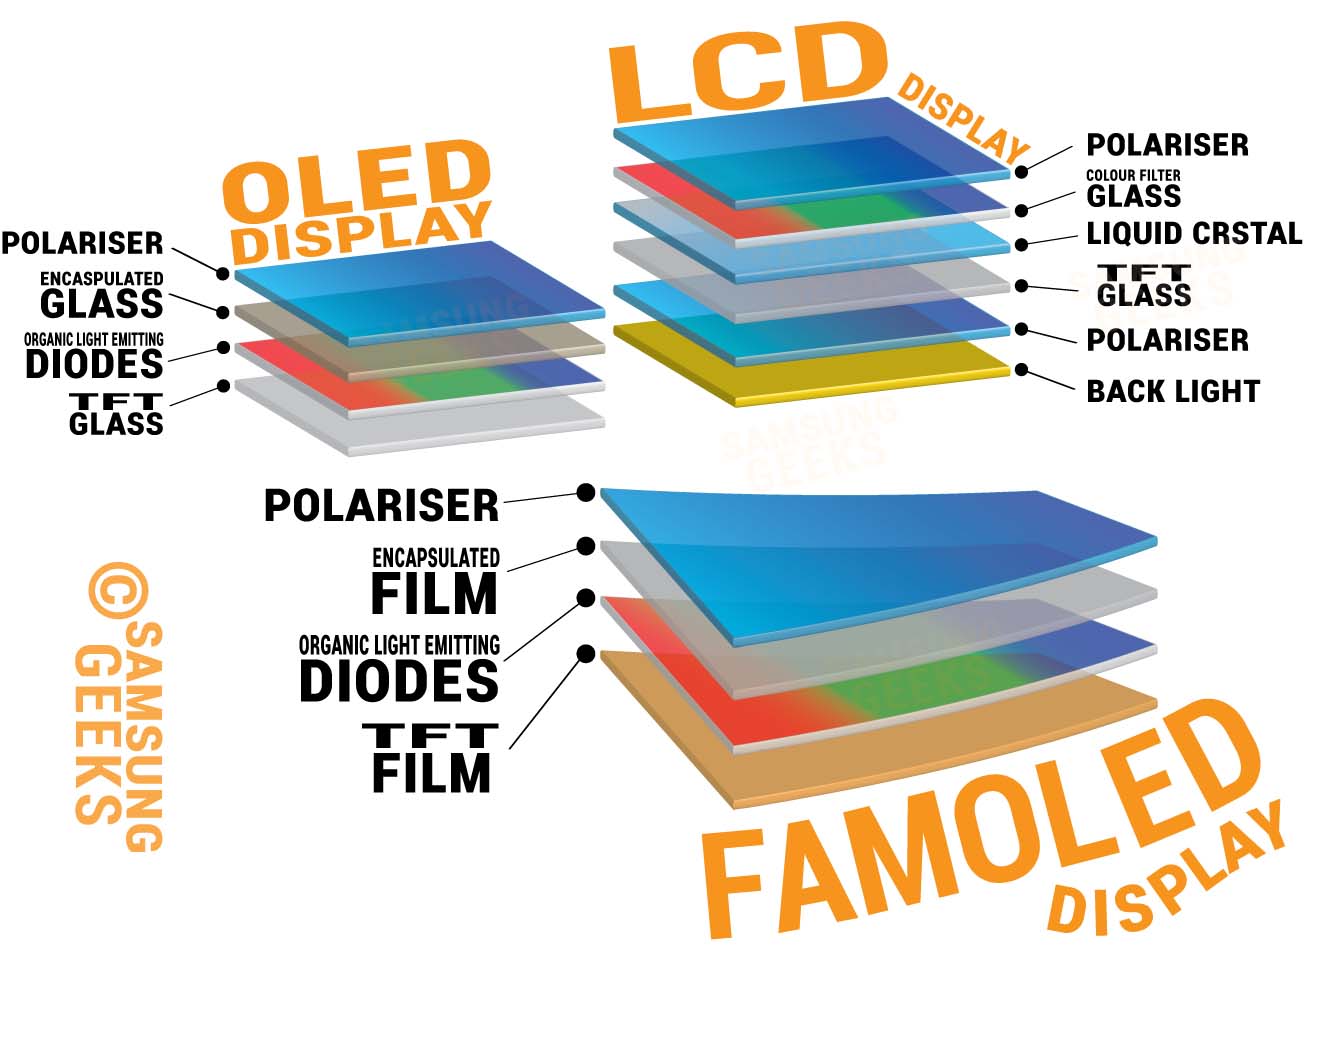
Traditional AMOLED screens use organic compounds which create their own light source when a current is passed through them. As the OLED pixels create their own light source, they don’t need a back light like LCD screen technology, but the circuitry to control the pixels is fused into glass. Flexible displays simply replace the layers of glass with layers of (flexible) plastic film, allowing for them to be bent and flexed without breaking anything.
Looking to “Corning”, the manufacturers of Gorilla Glass, we can see that a flexible protective glass coating for flexible displays isn’t completely out of the question. Their product Willow Glass will allow for the easy protection of flexible displays


Advantages:
1.The underlying display of curved phone is flexible, but the phones are still rigid.
2.These phones are more flexible and work better in hands
3.These phones has less weight then other phones
4.The curved screen Smartphone has a more comfortable grip to hold than other competing mobile devices
5.The curved smart phone is user-friendly and can be accessed easily

Disadvantages: 
1.The cost of curved smart phones is relatively high when compared to flat screen smart phones.
2.Except improved image quality, the features were almost similar to flat screen smart phones.
3.The only novelty is curved display and there are no other special features to attract consumer

Applications:
1.Mobile phones
2.wrist bands
3.LED tv

How to Install ClockWorkMode Revovery into your android Phone.


What is clockWorkMode?
ClockworkMod , or abbreviated as CWM is a custom recovery tool for Rooted Android phones , tablets and other devices . ClockworkMod was developed by Koushik Dutta . Recoveries like CWM are required to carry out several advanced operations like recovery , restoration , installation and maintenance on your Android phone . The most popular use of ClockworkMod is to install a Custom official or unofficial OS on any Rooted Android phone , also including which cannot be done with the stock Android recovery

There are two method by which you can install clockworkmode, Which are
Method 1:Flashing clockworkmode through odin.
Method 2:Flashing clockworkmode through Rom Manager.

The first method would require you to use a PC and flash the ClockworkMod file on your phone with the help of Odin . If you are a new Android user then you might want to skip this process and proceed with the second method , which is fairly very easy to use and even hassle free .
In order to use ClockWorkMod recovery you need a rooted android phone , tablet or any other device
Download the ROM manager app from the link given below . You don’t need to download the Clockworkmod recovery as the ROM manager app can download the specific Clockworkmod recovery according to your Android phones make and model .
Click HERE
Method 2: Flashing clockworkmode through Rom Manager.

Step 1: Install Rom manager on your android Device and run it.
Step 2: Select Recovery setup from the rom manager app.


Step 3: Under Install or update Recovery , Tap on clockworkmode recovery.
Step 4:Wait a few seconds for the app to identify your Phone’s make and model . If the app correctly displays your phone’s model then tap on it . Although the phone will recommend you to connect to a WiFi network , a 3G data connection works perfectly , as the Clockworkmod recovery is around 7 to 8 MB is size for all Android Phones . Click ok to everything to proceed further .


Step 5:Tap on Flash ClockworkMod Recovery . The app will now begin to download the Clockworkmod recovery . Wait for a few seconds until the download completes . After the ClockworkMod recovery is downloaded , the app will automatically install it on your phone


 Step 6: To check if the ClockworkMod recovery is installed on your phone , return to Rom Manager’s home menu and tap on Reboot into Recovery . Your phone will now reboot and enter the ClockworkMod recovery

That’s it , now your Android phone has been successfully flashed with the latest ClockworkMod recovery . go ahead and install a custom Android ROM and enjoy your phone .

How to merge Partitions with windows 8.1 Disk Management

when partitioning hard disk I created a 10GB partition by mistake, which is so small. Now, it has saved nearly 10GB files and I can not go on storing data to it any more. Therefore, I want to merge it to its neighboring partition that saves similar files. So I finds simplest method that's why I am sharing it with you
Step 1:

   First of all, right click "Computer" icon on desktop, choose "Manage", and select "Disk Management" to launch the tool so as to get the following interface.


Then, delete the partition that will be included by using the function "Delete Volume", but users should back up all needed data in advance for deleting partition will lead to data loss.
Next, right click the partition that will contain the deleted partition and choose "Extend Volume" to extend the selected partition according to wizards. After extending is done, we merge 2 neighboring partitions with Windows 8.1 Disk Management successfully.
Of course, Windows Disk Management offers another way to combine 2 neighboring partitions, namely deleting both partitions to create a larger one, but this way requires users to backup both partitions. As a matter of fact, it is possible to merge partitions without deleting any partition. The partitioning tool MiniTool Partition Wizard can help complete the very operation.
                               Merge Partitions with MiniTool Partition Wizard

Step 2:Run partitioning program to get its main interface:


Step 3:Select any partition and click on "Merge Partition"


Here, we take merging partition F to partition G on Disk 1 for example.
Step 4: Select Disk 1 and choose the partition that will be expanded, namely partition G. Then, click "Next".


Step 5:choose the partition which will be included, namely partition F, and click "Finish".


Now we can see partition F is included to G which becomes 119.58GB from original 103.05. 
Step 6:click on "Apply" button to apply all changes.

After application is completed, the whole work to combine 2 neighboring partitions is done. Some users may ask where data saved in partition F are. Don’t worry, because they are safely stored in the folder "Merged partition content" on partition G. Therefore, users are suggested to merge partitions by using MiniTool Partition Wizard rather than Windows 8.1 Disk Management. The very partitioning tool will give you a lot of other surprise apart from combining partitions.
To download this tool, Click HERE

Friday, December 25, 2015

Difference between RAM and ROM

Computer ROM:
                         A good example of ROM in the computer is the computer BIOS, a PROM chip that stores the programming needed to begin the initial computer start up process. Using a non-volatile storage is the only way to begin the start up process for computers and other devices that use a similar start up process. ROM chips are also used in gaming system cartridges, like the original Nintendo, Gameboy, Sega Genesis, and a number of others. The game cartridge stores the game programming on a ROM chip that is read by the game console when the cartridge is inserted into the console.Today, ROM-type storage media is still used and continues to be improved upon for better performance and storage capacity


Computer RAM:
                    RAM chips are also used in computers, as well as other devices, to store information and run programs on the computer because RAM is one of the fastest memory in your computer. For example, the Internet browser you are using to read this page has been loaded into memory and is running from memory. However, as mentioned earlier, any information stored in the RAM chip is lost if the computer is turned off or loses power


                                         Difference between RAM & ROM

  • A ROM chip is non-volatile storage and does not require a constant source of power to retain information stored on it. When power is lost or turned off, a ROM chip will keep the information stored on it. In contrast, a RAM chip is volatile and requires a constant source of power to retain information. When power is lost or turned off, a RAM chip will lose the information stored on it.
  • A ROM chip is used primarily in the start up process of a computer, whereas a RAM chip is used in the normal operations of a computer after starting up and loading the operating system.
  • Write a data to a ROM chip is a slow process, where writting data in RAM chip is a fast process.
  • A RAM chip can store multiple gigabyte(GB) of data,upto 16 GB or more per chip. A ROM chip can store only several megabytes (MB) of data, upto 4mb or more per chip

4k Video resolution

Definition:
                   4K refers to one of two high definition resolutions: 3840 x 2160 pixels or 4096 x 2160 pixels. 4K is four times the pixel resolution, or twice the line resolution (2160p), of 1080p (1920 x 1080 pixels) that is one of main current consumer high definition resolution standards. The other high definition resolutions currently is use are 720p and 1080p . 4K is now officially designated for consumer products as Ultra HD or UHD, but is also referred to at times, such as in professional or commercial settings as Ultra High Definition, 4K x 2K, or Quad High definition 
        Also, 4K, under its two official consumer labels, Ultra HD or UHD, is beginning to be implemented into the home theater environment, using the 3840 x 2160 pixel option, via both a growing number of home theater receivers that have either 4K pass-through and/or 4K video upscaling capability, as well as some 3D and non-3D TVs and 3D video projectors.

What 4k really mean for consumers:
             The increasing availability of 4K, under the official moniker Ultra HD, can deliver consumers a greatly improved video display image for larger screen applications, and can greatly reduce the ability for viewers to see any visible pixel structure on the screen, unless you place yourself extremely close to the screen. This means even smoother edges and depth - in fact, when combined with faster screen refresh rates, 4K has the potential to deliver almost as much depth as 3D - without the need for glasses
                     If you want to download 4k videos first of all must you must install 4k video down loader otherwise you may not access to 4k videos, after that open youtube site then search 4k videos and copy its link then paste it in down loader and your downloading will be start 
To Download 4k video downloader Click HERE

Make a Youtube Video into an Animated gif


                 YouTube is a great site for watching videos and using the site gifyoutube you can make any section of any video into an animated Gif. To create an animated Gif using this site follow the steps below.
Note: To make this page easier the Youtube and Gif Youtube link open in new Tab.

Step 1:-


           Open YouTube and find the video you want to make a clip. Copy the URL of the video you want to use. In this example, we are using the below URL.
To open Youtube Click HERE
Step 2:-
         Open GifYouTube and paste the URL into the text box and click the Create GIF button.

To Open Gif, Click HERE
Step 3:-

         In the Configure Your GIF window select the Start Time, Gif length, and Title of your animated Gif and then click Create GIF.
Step 4:-

        Once the image has been crated you can share on any of the major social networking sites or click the chain icon to get the path to the image file or path to GifYt. Below is an example of an animation of the URL used earlier


Tip:-
       An easy method of creating any animated Gif images in the future is to remember that you can add "gif" in front of any YouTube URL to automatically be forward to the site. For example, https://www.youtube.com/watch?v=MKVWBUwoV4o would become https://www.gifyoutube.com/watch?v=MKVWBUwoV4o.
.